Howdy again all, and Happy Binary Day! It’s time for another edition of the DemoVixen’s How To. This is the second installation of our two-parter from last…forever-ago.
Subjects:
Prologue
Steel Cap D
Steel Cap E
Cold Steel
(BLU Offense, Part II)
When last we left off, your team had just gained C cap and were thrusting into RED’s stronghold to take the last two…wow, this has been a long match. There’s been a few big updates and a lot of changes to TF2 since then, so while we’ll jump in I’ll try my best to incorporate pertinent new stuff.
With the fall of C, the bridge walkway granting access to E for the less mobile classes is now available, opening the third way to get to D. RED has less space to work with now, but will be determined to lock out D and E as best they can.
Interior D: Drawn and Quartered…
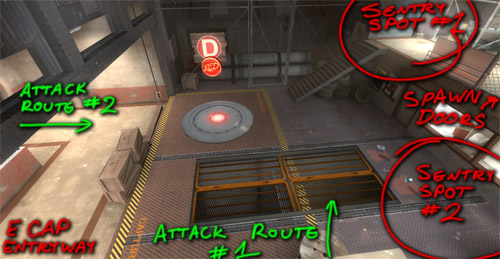
fig. a.1
D Cap. An enclosed, close- to mid-quarter zone where you now have four access points to get in from. The closer quarters will work for and against you: you’ll have better control of explosions in halls and corridors, but if a fight comes down to CQC you’ll have less maneuvering room. Concerning enemy Engineers, the most effective places to build a covered sentry will be atop the spawn-ramp stair, on the ground before the spawn facing the point and far entrance, and in the entryway that leads from E.
With the proper cover and quick edging (popping out of cover just long enough to throw a sticky and duck back), these risky positions can be addressed from attack route 1. You might not even need an Übercharge. Remember however that from the position in figure a.1, you are in the vicinity of the enemy’s spawn room and they can exit it to attack you at any time, so caution is always necessary. Note that RED is vulnerable from attacks coming from the upper spawn door landing leading into D from C, so your preference for attack should be that direction (unless enemy concentration is focused there). In that case, attacking from the far west entryways (attack route 2) are a viable way to go as they can provide adequate cover and are often a less-heeded threat than the upper spawn landing. it’s good for getting close as an Übercharged pair, popping out and flinging a few bombs into a crowd that’s competing on the cap, or to get some explosives onto the upper landing to deal with enemies and hardware there.
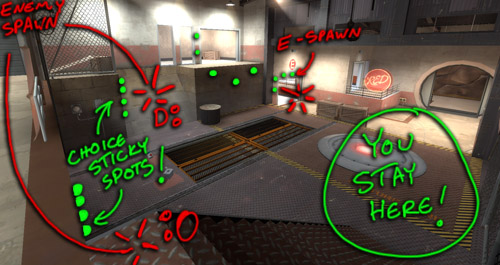
fig. a.2
Upon taking the point, if you are granted a brief respite from fighting, you’ll need to decide quick where best to place your stickies as a trap. Respawning enemies, 8 times out of 10, will be coming straight from the upper landing spawn doors, so leaving trap stickies where they’ll be unexpected is a good idea (I’m avoiding situations where one commits spawn camping; opinions vary, but my personal philosophy is choosing to resort to spawn-killing doesn’t teach you much). The enemy does not have a clear shot at the point from the spawn, so performing a fake out–acting as if you don’t see them coming by not looking at them or acknowledging their maneuvering to attack you–is an effective setup for the bombs placed in the locations in figure a.2.
In the case of the 2 out of 10 who will leave the E-side spawn door and attack D from E (or possibly defenders coming from E), their direct access is the E Entryway. Sticky-trapping this entry is ideal, but you must be wise in trapping here as splitting stickies between it and your traps on the upper landing will make both less effective. Furthermore, the medium health kit in the entryway is there to heal a survivor.
Entering D from E, an enemy will either immediately cut in front of the crates and engage you, or slip behind the crates to round to the other side. So be prepared for the possibility of attacks from E, the worst case scenario being a Heavy, Scout or Pyro suddenly popping into view at mid- to close range. Stickies hidden as noted can damage or kill most classes, and having your grenade launcher trained in that direction can put down the wounded and suppress its backup. Being alone on D cap is a terrible situation, but it’s possible if you are creative with your stickies, conservative of your ammo, and remain observant of the three primary entryways RED will use to come kill you.
If you’re fortunate to survive long enough to score a capture of D, you’ve essentially trapped RED to roughly one half of a room that they have to fight to turn into one whole locked-down room if they wish to survive. It’s time to push the full of your team into the grinder.
Launch Chamber E: “You Shall Not Pass!”
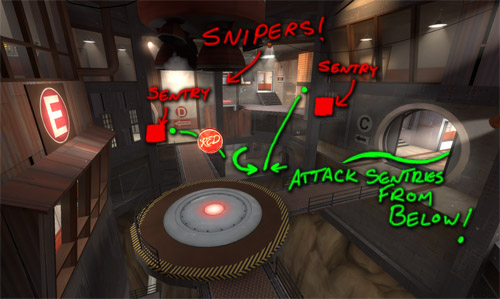
fig. b.1
E-cap Rocket Chamber: A nightmare for Redmond’s boys to defend from Blutarch’s determined and wily team. It’s a sweet spot of a cap point to attack. If there is a sentry in the hall from D to E, you can easily edge it to destroy it. Barring enemy Snipers across the way and enemy Spies who have the full range of the base to get at you, you have more cover here than most any other cap save for B, and it’s all because of the little sub-ledge that lay just beneath the Engineering deck on RED’s side. Arrows lead into it from B door and C basement. This oft-overlooked platform has a slight lip that can allow you to safely chuck stickies up onto the ceiling above the Engineering deck and on top of Engy buildings; three to five spaced about in afoot-wide cluster will be sufficient to kill the Engineer and anything he has built there often times without the Engy or his sentry even being aware. Talk about convenient!
Furthermore, RED defenders who are swarming a capture point are most likely looking at the B-C joint entryway that is level with the cap itself, expecting an attack from B or even the far A-side access. Four grenades into a cluster of RED defenders fighting or swarming that cap will make sure that everything there has a bad day.
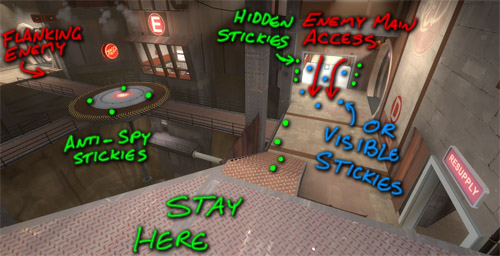
fig. b.2
But let’s say your team has made a push straight from D into E corridor and, for the time being, owns RED’s landing territory. This is where you can be the single most important defender for the team, the block from which the enemy must pay hell just to pass. Take a look: hanging back on the Engineer deck gives you an overlook of the entryway leading into D and any other way RED might come to attack those on the point. RED attackers cannot use the resupply doors facing E due to the doors locking down when D is capped, so it’s likely they will approach from D. Sticky-trapping the hell out of the entryway is an excellent way to ensure that RED cannot reach your teammates in time. Like locking down D, the Scottish Resistance would shine in this situation, but the classic launcher is fine.
You have many options, all more efficient than D’s: making visible stickies will be a deterrent and cause the enemy to hesitate. Hiding trap stickies will lull the enemy into rushing the corridor, carrying them right into an unexpected detonation. Stickies cannot grab the catwalks, so you can roll them to the ends to stick to the landing or the cap itself and be a trap for Spies or other enemies that attack your teammates directly; You’re on the platform to defend them, after all. The staple of your combat ability is area denial; use it. If you can coerce a Medic into hanging out with you on the Engy deck, do so, but it’s not really crucial; the Sniper cabin has sufficient health and ammo for you.
Beware of bombs or rockets coming from the sub-level beneath you, and watch out for enemies firing down the hall at you, especially Snipers. Always have grenades in the chamber in case you need to fire down the stairs or sticky-trap the stairs itself. One Demo playing gatekeeper can ensure that the BLUs huddled on the point have minimal threat to deal with.
If you cannot afford to play gatekeeper, you’ll need to place your bombs with an eye towards possible avenues RED will attack from. The little window in the figure is a favored firing spot of Snipers, Heavies, Soldiers, Demomen…it offers nice protection from the point.
That is why it must be sticky-trapped.
If your ‘nade aim isn’t up to snuff to make the hole from the point, leave stickies above and behind the heads of anyone who would stand in that alcove and fire at the point. Enough to kill a Heavy and with a 1-foot spread to catch more people. The Engineer deck must not be allowed to be occupied by enemies. This whole area is a stretch to defend like D is, and taking it by your own against numerous enemies is almost guaranteed to fail. So be sure to have backup, or at least a Medic to keep you alive while capping.
The key to E is locking RED out of getting firing solutions on the cap, if not out of the room itself. If you can succeed in this, then cheers, mate: Victory is yours. And thus, the end of this tutorial. I hope my approaches to Steel help at least some of you, and you can come up with different and maybe even superior tactics for yourself. It’s all in how you approach a problem, boyo!
Thank you for reading! Next time, we’ll tackle another difficult map as this most versatile class! Feedback for The DemoVixen’s How-To is totally welcome either here or on Niko’s Steam Communities profile page.
- Voop Out
Tags: guides, strategies, TF2


Thefurrypound…
[...] something about thefurrypound[...]…